Wednesday, 30 November 2011

Ferris Wheel source images

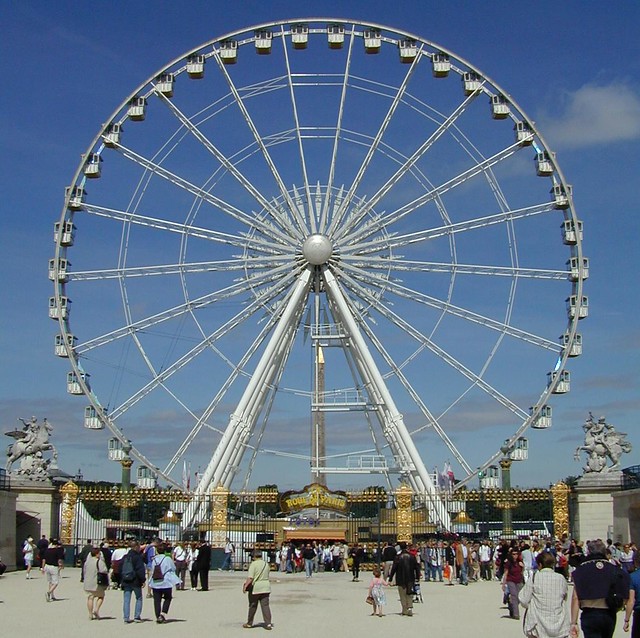
For the final window scene I had planned to have an amusement park with a spinning ferris wheel and a roller coaster shooting past the window. Unfortunately there aren't many fairgrounds around in the middle of November so I wasn't able to get any footage or images myself, so I turned to my good friend Mr. Google for help!


Image credit: http://www.flickr.com/photos/erichoward/


There are plenty of great images of ferris wheels on the Internet, many of which are reasonably high quality, but unfortunately many of them are from the wrong angle! A lot of the more suitable ones were of horrendous quality or in motion, with lots of tiny lines and flashing lights that proved a complete nightmare to try and cut out neatly. As much as I'd love to have a full-colour ferris wheel spinning in the background, I don't really think it's too practical.

A couple of results were of silhouetted wheels which gave me the bright idea of creating a vector illustration to use, which would be much more simple to achieve. There are a few really really nice ones on Google but they're terribly low quality so I may end up just resizing them and then re-tracing the image to clean it up.


Friday, 25 November 2011

WIP "Holland" scene V1


(Sorry for the awful quality. Blogger's video upload was being temperamental and I had to resort to Photobucket!)

Got the second cow in there now and even managed to get the windmill going! The picture I took was of relatively high resolution and the contrast between the sky and the body of the mill itself was great enough to make the selection process really easy. To get the sails to rotate I simply cut them out of the original image and pasted them onto a new layer. 


This obviously left a huge gap in the body of the windmill which I did a quick (and pretty shoddy) repair job on — but again, much like the cows, it's far off into the distance so I don't think it's too noticeable…!

To fill the gaps I simply made a feathered selection of the rough shape of the top of the windmill. I moved this selection and copied a large chunk of the body, which has a very similar texture/pattern.


It's far from an exact match and there's part of a window floating in the top left corner, but fortunately the position of the sails will mostly cover up the inconsistencies.

To repair the rest of the body I used a small clone stamp to brush in the missing sections.


It looks terrible, but once you put the sails on...


... It doesn't look too bad. Certainly adequate for my needs!

I think things are looking okay so far in terms of composition. I still need to find an office chair that matches the angle of the desk and my shoddy rotoscoping job on the cows is still really bothering me (especially on the tail), but aside from that I think that this will certainly be useable in my final film.

Lawrence gave me some great advice on using additional cameras and After Effects' 3D layer controls to create a false depth of field which massively improved the look of the scene. Already I'm seeing potential for this idea in the final film — I could blur the scene behind the window frame very slightly before shifting the focus to the field outside, just before everything pops on-screen.

Thursday, 24 November 2011

Second attempt with Roto Brush

I have absolutely no idea what was I (or it) was doing earlier, but the Roto Brush tool seems to be working absolutely fine now. How bizarre!


My second attempt was infinitely more successful. I ran into a few problems with the background — it's a very similar colour to the cow so it was difficult to keep the selection consistent and close to her body. It's pretty shoddy and the outline wobbles all over the place but I wasn't too terribly meticulous with my selection — I figured that seeing as half of the cow would be hidden behind the window it wouldn't matter too much if it was less than perfect.

After watching a few more tutorials and having another go with it I feel much more comfortable with how it works. When you start painting your first selection you create a sort of "key frame" that After Effects uses as a point of reference for the following frames. It then creates a "span" which extends 20 frames ahead of and 20 frames behind (assuming there are that many frames ahead of/behind your reference frame). This span uses the information from the reference frame to calculate the movement of the selection as the selected object moves around. You can scrub through and view After Effects' automatically generated selection and for the most part, it's pretty accurate. Minor adjustments can be made simply by re-painting your selection on each frame.


The Roto Brush span lives just above the main timeline — the key/reference point is marked with a yellow square and the frame span is shown by a grey rectangle and series of arrows extending in either direction away from the key frame. My reference point was at the very beginning of the clip, so my span only extends forward. The default is 20 frames but you can extend it as long as is required. In the case of large differences between frames (in a clip with a lot of movement) it is often better to draw a new reference point rather than allowing After Effects to calculate the selection automatically.


Much like any other tool, the Roto Brush has a number of different parameters than can be used to really refine your selection. "Propagation" is quite complex and isn't something I delved in to, but it relates to how After Effects calculates the selection in each frame by tweaking things like pixel search radius.

The most interesting section for me were all the "refine matte" options. Much like Photoshop's "refine edges" function, it allows you to tweak the selection by smoothing, feathering and reducing the "wobbling" of your selection edges. Decontaminate colours does its best to remove traces of colour from the background seeping into your selection edges. For example if you had an object on a red background it would attempt to neutralize the leftover red tones from the edges of your object.


In the images above you can see how using decontaminate colours helped to trim excess pixels and neutralise the green tones from the edges of my cow — most notably on the neck.


I took the rotoscoped footage and scaled it down slightly before placing it on the background. I'm not too happy with the position of the cow — originally I wanted it more to the right of the shot but when I tried this the back end of the cow was obscured by the curtain. Seeing as the tail is where most of the movement is this resulted in it just looking like a static image, so I had to shunt it to the left a little so the tail would still be visible. I think I may try adding a second cow slightly off in the distance to the right of the window to bring the scene back into balance.

Fortunately the biggest problem area — the belly of the cow — is hidden by the window, meaning I don't need to worry too much about fixing that selection. Having said that there are some obvious problem areas I need to go back and refine — the neck and head of the cow and the tail. The tail was quite difficult to select owing to all the blurring in each frame but I think if I go back with a smaller brush I may be able to clean it up a little.

I also need to fix the unsteady camera. I don't own a tripod and had to balance my camera on a rickety wooden fence so there's a bit of jump in the footage. I think if I keyframe the position slightly to re-align everything in each frame it should be alright.
Wednesday, 23 November 2011

First attempt with the Roto Brush tool

As mentioned previously, I spent some time today trying to get to grips with the Roto Brush tool with varied results. Mostly bad.


From what I understand of the Roto Brush tool so far, it works very similarly to the quick selection tool in Photoshop, by applying what is effectively an additive mask to the area that you paint over. It uses a fairly intuitive edge detection system that allows you to paint very vaguely around your object and still get a relatively accurate selection. Once you've got the selection around your object you can then go in with a smaller brush and further refine the edges to get as accurate a selection as possible.


By holding Alt the cursor changes and the lines you paint become red. This is a subtractive brush and basically tells After Effects which parts of the background to ignore.

You're basically "training" After Effects to learn parts of each frame to keep, and what to exclude. Once you've created your starting point, After Effects uses the information to track the object you've selected as it moves in each frame.


My first attempt at using the roto brush tool was fairly disastrous. In theory I should have been able to create my selection and then scrub through, frame by frame, and make minor alterations to my selection. For some reason it just didn't work — when I painted over a layer, absolutely nothing was happening. The selection stayed exactly the same. None of the video tutorials I read gave me any indication as to what I was doing wrong, nor could I find anybody else online with a similar problem.

I can only assume that the problem was with the way I was brushing my selection initially. From what I can gather I may have been giving After Effects too much information on my selection — I was probably using too many brush strokes to define my edges (the trick is to get as accurate a selection in as few strokes as possible). I was probably too specific with the additive and subtractive brushes, leading to conflicting information until eventually there was nothing left to work with. You can see above the selection shrinks and jumps about until eventually all I'm left with is a couple of black splotches, because that was the only part of the image that I hadn't brushed.

Still, failed experiments are still valid! I'm going to go back and look at some more tutorials on the tool to see if I can better get to grips with it.