After a brief period of no blog updates, here's a bit of a bombshell: I've finished the animation!
I really should have continued updating with posts during the process showing what I'd been doing but I got so wrapped up in the essay and Animation Principles that I didn't really have any brain cells to spare. Working has, these past two weeks, become like a primary bodily function; I sleep, eat, breathe and work with very little room left in my brain to process much beyond that. To be honest though, making it was just repeating bits of what I've already been doing with different pictures.
The one big thing to note is that I ended up cutting the third "window scene" (the fairground) from the animation. I'd been working on the graphics for the roller coaster for about a week and was really struggling to animate it convincingly. I was still concerned about staying within the timescale, so I decided instead to leave it until the rest of the animation was finished to see whether I had enough screen time left to accommodate the scene. As it turns out I had already hit the max 40 seconds without it, so it worked out quite nicely and saved me a lot of stress!
I'm disappointed at having to cut the scene as I quite liked the flow of it but I don't think the animation suffers too much for it. I'm not entirely pleased with certain parts — mostly the typing sequences. He kinda looks like he's karate chopping the keyboard but it has a certain quirkyness to it I suppose. I could have done more with it but to be honest I'm feeling completely burned out — there are certainly things with it I could fix but I think there comes a point at which you have to take a step back and say "I'm done with this." When I've recovered a little more (and Animation Principles is done) I may return to it and make some minor tweaks, but for now, I'm relatively satisfied. Feels good to have it complete at any rate ;]
Next I think I'm going to produce an amended storyboard and animatic to show the cut down sequence. But first, back to Flash...
Monday, 19 December 2011
Sunday, 4 December 2011
New puppet and updated backdrop

I took some better pictures of Craig and updated my puppet with the new head. I'm much, much happier with how this looks. It's a lot cleaner now! I'm hoping to find a way to get the eyebrows neatly onto a separate layer so I can animate some better facial expressions. Cutting the eyebrow out is no problem — it's repairing the skin underneath that's proving tricky...

I also tweaked the background some more, adding a few more posters to make it a little less bare. I'm not sure I like it — seems a bit cluttered — but it's got a bit more flavour to it now. The poster on the far left was a happy accident — it just so happened to contain Craig's most used word! There was one that said "Hello, how are you?" in a multitude of different languages but it was really badly designed. I may make one of my own and put it there instead. Then at least I've still got his quote in there if the chat bubble doesn't work out.
Saturday, 3 December 2011
Paris scene — French couple
For the Paris scene I needed to somehow create a stereotypical French couple embracing. I was really dreading having to do this and have admittedly been putting it off for a while, as I hadn't a clue how I was going to do it! I ended up using similar techniques to how I created my Craig puppet and simply stitched together a bunch of photographs from Google.
I started with an image of a couple of ballroom dancers as the pose was quite similar to the sort of thing I wanted.
I began with this:
And finished with this:

I lost count of how many pictures I robbed off Google to put this together. The hands on the woman are really shoddy but they're probably going to be hidden behind the window frame so it hopefully shouldn't matter too much. I may go back and tweak them a bit — they're really bothering me!
I'm not totally done with this yet — still got a fair bit of tweaking to do, mainly on the woman. The hair and coat are bothering me and she just feels incomplete somehow. I'm not sure about the colours either.
I think it's the face as well — it's had virtually no editing to it. I think it's because the man is so ridiculously stereotypical whereas she's fairly ordinary, so it looks a little out of place. Maybe I'll darken her hair, give her ridiculously pale skin and bright red lips and a huge pair of sunglasses. For some reason French women are harder to caricature!
(What is it with me and French people?!...)
I started with an image of a couple of ballroom dancers as the pose was quite similar to the sort of thing I wanted.
I began with this:
 |
| (I love this — it's so hilariously awful) |
And finished with this:
I lost count of how many pictures I robbed off Google to put this together. The hands on the woman are really shoddy but they're probably going to be hidden behind the window frame so it hopefully shouldn't matter too much. I may go back and tweak them a bit — they're really bothering me!
I'm not totally done with this yet — still got a fair bit of tweaking to do, mainly on the woman. The hair and coat are bothering me and she just feels incomplete somehow. I'm not sure about the colours either.
I think it's the face as well — it's had virtually no editing to it. I think it's because the man is so ridiculously stereotypical whereas she's fairly ordinary, so it looks a little out of place. Maybe I'll darken her hair, give her ridiculously pale skin and bright red lips and a huge pair of sunglasses. For some reason French women are harder to caricature!
(What is it with me and French people?!...)
Thursday, 1 December 2011
After Effects ferris wheel
Et voila, as the French would say!
Took me quite some time but I finally got the ferris wheel to look like a ferris wheel. The wheel was just keyframed to rotate 360 degrees. The carts proved tricky at first — initially I simply parented the carts to the wheel as it rotated, which didn't exactly work. You can see what happened:
Obviously the rotation is all wrong and the carts remain upright and stationary, floating all over the place. In order to make them appear to be effected by gravity I had to have them rotate in the opposite direction to the wheel... whilst continuing to follow its overall rotation. Confused? I sure was!
Fortunately I managed to dig up some information and helpful tutorials to help me out!
After Effects has a brilliant set of features called Expressions. Expressions are little JavaScript-based pieces of code that allow you to get really deep into an object's parameters (opacity, position, etc) and control it in a much more precise way. The great thing about expressions is that they work alongside existing keyframes rather than replacing them. This allowed me to keep the overall motion path (i.e. the rotation of the wheel) whilst have them counter-rotate as they span to maintain the feeling of gravity.
The first thing I had to do was split each of those carts onto a separate layer. This allowed me to set the anchor point of each individual cart to the point where it connects to the main wheel, so that it would swing from that point only.

After that lengthy and boring process, I then parented each cart to the wheel so that it would follow the rotation.
I then had to add an expression to each cart layer that would basically tell the cart to remain vertical even as the wheel rotated.

To add an expression, select the parameter of the layer you want to parent (in this case, the rotation of one of the cart layers) and go to Animation -> Add Expression.
 |
| (Naughty Alex hasn't labeled his layers) |

A new text field will open up within the timeline and this is where you scribble all your Expressions. The first half of the code was automatically inserted — from what I gather it's simply telling this layer to mimic the rotation of "Layer 2". The only part of code I added was "*-1" which literally means "multiply by -1," i.e reversing the rotation. Multiplying anything by -1 within After Effects gives you its opposite — don't ask me why, I'm not a maths person!
I then had to repeat this process for infinite (or until all my carts were done at least)
The final result one more time:
Overall I'm pretty pleased with the movement, less so with the vector image. I think it's a little too quick but that's easily rectifiable. I'm still annoyed at having accidentally picked a stock image. Though it wouldn't take a terribly long time I'm just a little miffed at the prospect of re-doing another image!
At any rate, I have the flu (again), my ears are ringing and my mouth tastes like mushroom soup (?!). I'm going to bed!
Vector ferris wheel
I found this one on Google, but again it was really low quality. I blew it up by about 200% (look at the lovely JPEG artifacts!) and started to trace over it — this gives me the benefit of separating each part into layers for me to animate!


It's really quick and pretty shoddy but I figured since it's going to be in the distance, much like the cows, it shouldn't matter too much. It was a really simple pen tool job to which I simply applied stroke paths of varying thicknesses. The wheel itself is on the bottom layer, the carts are on another layer and the weird girder thing is on the top layer. This will allow me to parent the carts to the wheel and mimic the rotation as it spins.
I didn't notice at first but I think the image of the ferris wheel that I used is actually a stock image — whoops. I honestly wasn't aware — I nabbed it off another website which had taken the thumbnail from a stock image resource. Serves me right for not checking my sources!
I'm a bit concerned now and I probably shouldn't use it in my final film, however seeing as I've gone to the trouble of resampling the image I think it'll be alright to use it just for this one test? I'll probably just have to re-do it from scratch for use in the final animation.
Wednesday, 30 November 2011
Ferris Wheel source images
For the final window scene I had planned to have an amusement park with a spinning ferris wheel and a roller coaster shooting past the window. Unfortunately there aren't many fairgrounds around in the middle of November so I wasn't able to get any footage or images myself, so I turned to my good friend Mr. Google for help!

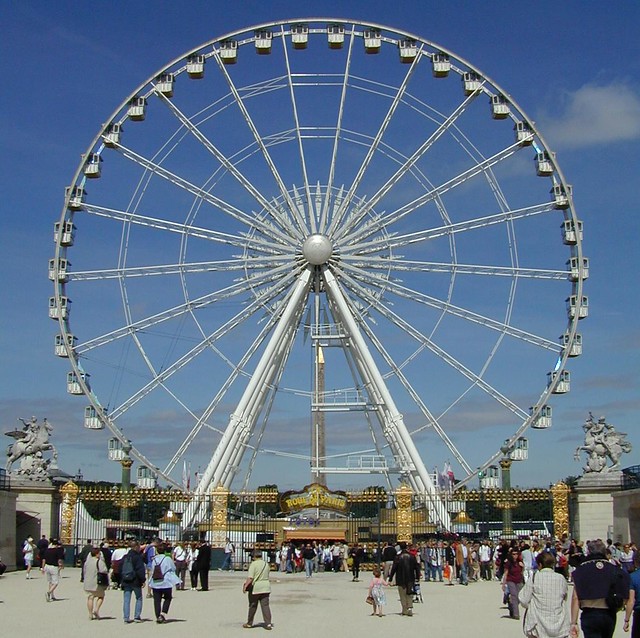 |
| Image credit: http://www.flickr.com/photos/erichoward/ |
There are plenty of great images of ferris wheels on the Internet, many of which are reasonably high quality, but unfortunately many of them are from the wrong angle! A lot of the more suitable ones were of horrendous quality or in motion, with lots of tiny lines and flashing lights that proved a complete nightmare to try and cut out neatly. As much as I'd love to have a full-colour ferris wheel spinning in the background, I don't really think it's too practical.
A couple of results were of silhouetted wheels which gave me the bright idea of creating a vector illustration to use, which would be much more simple to achieve. There are a few really really nice ones on Google but they're terribly low quality so I may end up just resizing them and then re-tracing the image to clean it up.


Friday, 25 November 2011
WIP "Holland" scene V1
(Sorry for the awful quality. Blogger's video upload was being temperamental and I had to resort to Photobucket!)
Got the second cow in there now and even managed to get the windmill going! The picture I took was of relatively high resolution and the contrast between the sky and the body of the mill itself was great enough to make the selection process really easy. To get the sails to rotate I simply cut them out of the original image and pasted them onto a new layer.

To fill the gaps I simply made a feathered selection of the rough shape of the top of the windmill. I moved this selection and copied a large chunk of the body, which has a very similar texture/pattern.


It's far from an exact match and there's part of a window floating in the top left corner, but fortunately the position of the sails will mostly cover up the inconsistencies.
To repair the rest of the body I used a small clone stamp to brush in the missing sections.

It looks terrible, but once you put the sails on...

... It doesn't look too bad. Certainly adequate for my needs!
I think things are looking okay so far in terms of composition. I still need to find an office chair that matches the angle of the desk and my shoddy rotoscoping job on the cows is still really bothering me (especially on the tail), but aside from that I think that this will certainly be useable in my final film.
Lawrence gave me some great advice on using additional cameras and After Effects' 3D layer controls to create a false depth of field which massively improved the look of the scene. Already I'm seeing potential for this idea in the final film — I could blur the scene behind the window frame very slightly before shifting the focus to the field outside, just before everything pops on-screen.
Thursday, 24 November 2011
Second attempt with Roto Brush
I have absolutely no idea what was I (or it) was doing earlier, but the Roto Brush tool seems to be working absolutely fine now. How bizarre!
My second attempt was infinitely more successful. I ran into a few problems with the background — it's a very similar colour to the cow so it was difficult to keep the selection consistent and close to her body. It's pretty shoddy and the outline wobbles all over the place but I wasn't too terribly meticulous with my selection — I figured that seeing as half of the cow would be hidden behind the window it wouldn't matter too much if it was less than perfect.
After watching a few more tutorials and having another go with it I feel much more comfortable with how it works. When you start painting your first selection you create a sort of "key frame" that After Effects uses as a point of reference for the following frames. It then creates a "span" which extends 20 frames ahead of and 20 frames behind (assuming there are that many frames ahead of/behind your reference frame). This span uses the information from the reference frame to calculate the movement of the selection as the selected object moves around. You can scrub through and view After Effects' automatically generated selection and for the most part, it's pretty accurate. Minor adjustments can be made simply by re-painting your selection on each frame.

The Roto Brush span lives just above the main timeline — the key/reference point is marked with a yellow square and the frame span is shown by a grey rectangle and series of arrows extending in either direction away from the key frame. My reference point was at the very beginning of the clip, so my span only extends forward. The default is 20 frames but you can extend it as long as is required. In the case of large differences between frames (in a clip with a lot of movement) it is often better to draw a new reference point rather than allowing After Effects to calculate the selection automatically.
 Much like any other tool, the Roto Brush has a number of different parameters than can be used to really refine your selection. "Propagation" is quite complex and isn't something I delved in to, but it relates to how After Effects calculates the selection in each frame by tweaking things like pixel search radius.
The most interesting section for me were all the "refine matte" options. Much like Photoshop's "refine edges" function, it allows you to tweak the selection by smoothing, feathering and reducing the "wobbling" of your selection edges. Decontaminate colours does its best to remove traces of colour from the background seeping into your selection edges. For example if you had an object on a red background it would attempt to neutralize the leftover red tones from the edges of your object.


In the images above you can see how using decontaminate colours helped to trim excess pixels and neutralise the green tones from the edges of my cow — most notably on the neck.
I took the rotoscoped footage and scaled it down slightly before placing it on the background. I'm not too happy with the position of the cow — originally I wanted it more to the right of the shot but when I tried this the back end of the cow was obscured by the curtain. Seeing as the tail is where most of the movement is this resulted in it just looking like a static image, so I had to shunt it to the left a little so the tail would still be visible. I think I may try adding a second cow slightly off in the distance to the right of the window to bring the scene back into balance.
Fortunately the biggest problem area — the belly of the cow — is hidden by the window, meaning I don't need to worry too much about fixing that selection. Having said that there are some obvious problem areas I need to go back and refine — the neck and head of the cow and the tail. The tail was quite difficult to select owing to all the blurring in each frame but I think if I go back with a smaller brush I may be able to clean it up a little.
I also need to fix the unsteady camera. I don't own a tripod and had to balance my camera on a rickety wooden fence so there's a bit of jump in the footage. I think if I keyframe the position slightly to re-align everything in each frame it should be alright.
My second attempt was infinitely more successful. I ran into a few problems with the background — it's a very similar colour to the cow so it was difficult to keep the selection consistent and close to her body. It's pretty shoddy and the outline wobbles all over the place but I wasn't too terribly meticulous with my selection — I figured that seeing as half of the cow would be hidden behind the window it wouldn't matter too much if it was less than perfect.
After watching a few more tutorials and having another go with it I feel much more comfortable with how it works. When you start painting your first selection you create a sort of "key frame" that After Effects uses as a point of reference for the following frames. It then creates a "span" which extends 20 frames ahead of and 20 frames behind (assuming there are that many frames ahead of/behind your reference frame). This span uses the information from the reference frame to calculate the movement of the selection as the selected object moves around. You can scrub through and view After Effects' automatically generated selection and for the most part, it's pretty accurate. Minor adjustments can be made simply by re-painting your selection on each frame.
The Roto Brush span lives just above the main timeline — the key/reference point is marked with a yellow square and the frame span is shown by a grey rectangle and series of arrows extending in either direction away from the key frame. My reference point was at the very beginning of the clip, so my span only extends forward. The default is 20 frames but you can extend it as long as is required. In the case of large differences between frames (in a clip with a lot of movement) it is often better to draw a new reference point rather than allowing After Effects to calculate the selection automatically.
The most interesting section for me were all the "refine matte" options. Much like Photoshop's "refine edges" function, it allows you to tweak the selection by smoothing, feathering and reducing the "wobbling" of your selection edges. Decontaminate colours does its best to remove traces of colour from the background seeping into your selection edges. For example if you had an object on a red background it would attempt to neutralize the leftover red tones from the edges of your object.


In the images above you can see how using decontaminate colours helped to trim excess pixels and neutralise the green tones from the edges of my cow — most notably on the neck.
I took the rotoscoped footage and scaled it down slightly before placing it on the background. I'm not too happy with the position of the cow — originally I wanted it more to the right of the shot but when I tried this the back end of the cow was obscured by the curtain. Seeing as the tail is where most of the movement is this resulted in it just looking like a static image, so I had to shunt it to the left a little so the tail would still be visible. I think I may try adding a second cow slightly off in the distance to the right of the window to bring the scene back into balance.
Fortunately the biggest problem area — the belly of the cow — is hidden by the window, meaning I don't need to worry too much about fixing that selection. Having said that there are some obvious problem areas I need to go back and refine — the neck and head of the cow and the tail. The tail was quite difficult to select owing to all the blurring in each frame but I think if I go back with a smaller brush I may be able to clean it up a little.
I also need to fix the unsteady camera. I don't own a tripod and had to balance my camera on a rickety wooden fence so there's a bit of jump in the footage. I think if I keyframe the position slightly to re-align everything in each frame it should be alright.
Wednesday, 23 November 2011
First attempt with the Roto Brush tool
As mentioned previously, I spent some time today trying to get to grips with the Roto Brush tool with varied results. Mostly bad.

From what I understand of the Roto Brush tool so far, it works very similarly to the quick selection tool in Photoshop, by applying what is effectively an additive mask to the area that you paint over. It uses a fairly intuitive edge detection system that allows you to paint very vaguely around your object and still get a relatively accurate selection. Once you've got the selection around your object you can then go in with a smaller brush and further refine the edges to get as accurate a selection as possible.


By holding Alt the cursor changes and the lines you paint become red. This is a subtractive brush and basically tells After Effects which parts of the background to ignore.
You're basically "training" After Effects to learn parts of each frame to keep, and what to exclude. Once you've created your starting point, After Effects uses the information to track the object you've selected as it moves in each frame.
My first attempt at using the roto brush tool was fairly disastrous. In theory I should have been able to create my selection and then scrub through, frame by frame, and make minor alterations to my selection. For some reason it just didn't work — when I painted over a layer, absolutely nothing was happening. The selection stayed exactly the same. None of the video tutorials I read gave me any indication as to what I was doing wrong, nor could I find anybody else online with a similar problem.
I can only assume that the problem was with the way I was brushing my selection initially. From what I can gather I may have been giving After Effects too much information on my selection — I was probably using too many brush strokes to define my edges (the trick is to get as accurate a selection in as few strokes as possible). I was probably too specific with the additive and subtractive brushes, leading to conflicting information until eventually there was nothing left to work with. You can see above the selection shrinks and jumps about until eventually all I'm left with is a couple of black splotches, because that was the only part of the image that I hadn't brushed.
Still, failed experiments are still valid! I'm going to go back and look at some more tutorials on the tool to see if I can better get to grips with it.
From what I understand of the Roto Brush tool so far, it works very similarly to the quick selection tool in Photoshop, by applying what is effectively an additive mask to the area that you paint over. It uses a fairly intuitive edge detection system that allows you to paint very vaguely around your object and still get a relatively accurate selection. Once you've got the selection around your object you can then go in with a smaller brush and further refine the edges to get as accurate a selection as possible.

By holding Alt the cursor changes and the lines you paint become red. This is a subtractive brush and basically tells After Effects which parts of the background to ignore.
You're basically "training" After Effects to learn parts of each frame to keep, and what to exclude. Once you've created your starting point, After Effects uses the information to track the object you've selected as it moves in each frame.
My first attempt at using the roto brush tool was fairly disastrous. In theory I should have been able to create my selection and then scrub through, frame by frame, and make minor alterations to my selection. For some reason it just didn't work — when I painted over a layer, absolutely nothing was happening. The selection stayed exactly the same. None of the video tutorials I read gave me any indication as to what I was doing wrong, nor could I find anybody else online with a similar problem.
I can only assume that the problem was with the way I was brushing my selection initially. From what I can gather I may have been giving After Effects too much information on my selection — I was probably using too many brush strokes to define my edges (the trick is to get as accurate a selection in as few strokes as possible). I was probably too specific with the additive and subtractive brushes, leading to conflicting information until eventually there was nothing left to work with. You can see above the selection shrinks and jumps about until eventually all I'm left with is a couple of black splotches, because that was the only part of the image that I hadn't brushed.
Still, failed experiments are still valid! I'm going to go back and look at some more tutorials on the tool to see if I can better get to grips with it.
Subscribe to:
Posts (Atom)